

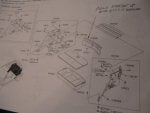
A full day of modification for me, I DYNA-MATED my spare tire area. I also removed the rear side panels to cover the wheel wells with the 'FAT-MAT' brand of dyna-mat. I have a document saved as a PDF, but I can not attach it, here is a photo of the diagram.
![]()
The rear seats can stay bolted in. The rear lower seat comes up in the front and one bolt holds it, access that from the rear. I had to un-bolt the lower seat belt bolts.
The hatch door sill, the saddle, has one fastener on the inside, center. Use your plastic trim removal tool to pry this saddle piece STRAIGHT UP. 4 Fasteners hold it.
Pull upward on the lower rear seat and loosen it from it's two front stays. Go to the back and unbolt the one center bolt holding the rear seat in.
Each side panel has 4 screws to remove. One is under the saddle trim piece, two are on the trunk floor and the third screw is accessible when you remove the rear side door saddle. It pulls STRAIGHT UP. 5 Fasteners and 4 clips, at the top, pop off. Once loose, wiggle the panel around the rear seat back to remove.
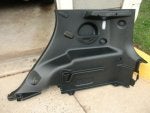
Install DYNA-MAT as needed. I used 50 square feet. I will post photos of the panels.
![]()
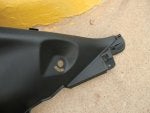
This side has easy to remove connections for the light and the power outlet.
![]()
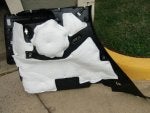
There is some acoustic insulation on the back of the panels.
![]()
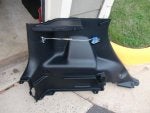
I created a grocery hook that will work better than the net hook. I do not use the net, but I had to buy one with this car. See the Classified section if you need a net cheap.
![]()
Seat belt bolt hole. More....
The rear seats can stay bolted in. The rear lower seat comes up in the front and one bolt holds it, access that from the rear. I had to un-bolt the lower seat belt bolts.
The hatch door sill, the saddle, has one fastener on the inside, center. Use your plastic trim removal tool to pry this saddle piece STRAIGHT UP. 4 Fasteners hold it.
Pull upward on the lower rear seat and loosen it from it's two front stays. Go to the back and unbolt the one center bolt holding the rear seat in.
Each side panel has 4 screws to remove. One is under the saddle trim piece, two are on the trunk floor and the third screw is accessible when you remove the rear side door saddle. It pulls STRAIGHT UP. 5 Fasteners and 4 clips, at the top, pop off. Once loose, wiggle the panel around the rear seat back to remove.
Install DYNA-MAT as needed. I used 50 square feet. I will post photos of the panels.
This side has easy to remove connections for the light and the power outlet.
There is some acoustic insulation on the back of the panels.
I created a grocery hook that will work better than the net hook. I do not use the net, but I had to buy one with this car. See the Classified section if you need a net cheap.
Seat belt bolt hole. More....